Hold the Beef has moved!

You should be automatically redirected.

If not, please visit http://www.holdthebeef.com and update your bookmarks and RSS feed.

Monday, June 29, 2009

ผัดไทย (I hope this says what I think it does)


If wikipedia is to be trusted, the title of this post should not be insulting your grandmother and telling you I'm a smelly ratbag, but rather should tell you what I made for dinner last night and ate leftovers of for lunch today.


I really love this Pad Thai recipe, and have never had a bad review from friends I've made it for. I think this is helped by the prevalence of incredibly bland and disappointing versions of Pad Thai a number of restaurants (generally lunch bars) seem to serve up around town. The use of wide, flat rice stick noodles does not necessarily a Pad Thai make. This recipe is packed with flavour, as evidenced by the smell of my house for hours after making it. Today was a particularly whiffy day, as I also needed to season a new wok, but at least the smell of liberated peanut oil molecules went nicely with the later addition of shrimp paste and tamarind, and now I have a nicely seasoned wok upon which to make more lashings of stinky fare!


I picked up the wok for a bargain from Tran's Emporium just down the road on Newcastle St in Northbridge. It was my first visit to Tran's and I was in heaven! Every Asian ingredient you could possibly need, and many things you have no idea why anyone would possibly need. I discovered there my new favourite snack - Roasted Seaweed (Laver) which is basically little snack packs of seasoned nori squares. I can't actually understand anything else written on the pack except that the ingredients are seaweed (laver), canola oil, corn oil, sesame oil and salt, and each pack contains 20 calories. What an oily bargain. I can foresee many happy moments in my future, strolling down the aisles of Tran's and buying strange things I may live to regret.


I was given this Pad Thai recipe by my sister, who put it together from a few different Pad Thai recipes she had. I'm glad I have a sister who is as keen on cooking as I am!


Oh and just to mention, the photos on this page are of my leftovers that I reheated for lunch today, and seem to be much more generous with the 'bits of stuff' and not so filled with noodles as the dish I was serving last night (plus I was quite rough when reheating it and managed to break up what noodles I actually did have in my serving). The recipe is thus more noodley than these photos may suggest. In fact, it may be called noodletastic, if one were so inclined.


ผัดไทย (Pad Thai.... I hope)

Ingredients
3 Tb tamarind puree*
2 Tb grated palm sugar
1/3 cup sweet chilli sauce (the one with the big roast chicken on the label! Has anyone ever used it on a big roast chicken?)
1/3 cup fish sauce
375 g packet of XL (the wide ones) rice stick noodles
300 g uncooked prawns
2 Mt Barker chicken breasts
2 cloves garlic, crushed
2 Tb dried shrimp paste
1 Tb grated fresh ginger
2 small red Thai chillies, seeded (if you're a big wimp) and coarsely chopped
1 Tb peanut oil
3 eggs, beaten lightly
2 cups bean sprouts
4 green onions, sliced thingly
1/3 cup coarsely chopped fresh coriander
1/4 cup coarsely chopped roasted unsalted peanuts
1 lime, quartered

* If you can't find tamarind puree (which has a smooth consistency) and can only find tamarind pulp (quite chunky consistency) you'll need to include an extra step in your method. Soak 40 g tamarind pulp in 1/2 cup boiling water for 30 minutes, giving it a good stir/squish every now and then. After the 30 minutes, strain the mixture over a bowl, pushing through as much of the pulp through the strainer as you can and making sure to scrape the underside of the strainer occasionally to collect all possible pulp. Discard the solids left in the strainer and use the pulp/liquid mixture in the bowl as for the tamarind puree in the recipe.

Method
1. Cook the chicken breasts in a moderate oven until cooked through. Shred apart using forks. Set aside.
2. Mix together the tamarind, palm sugar, sweet chilli sauce and fish sauce. Set aside.
3. Shell and devein prawns (and cut them into more manageable pieces if they're as mutantly gigantic as the ones I currently am lucky enough to have sitting in my freezer. I sliced them right down the middle, like butterflying but cutting all the way through). Set aside.
4. Place noodles in a large heatproof bowl. Cover with boiling water until they soften. Drain noodles and set aside.
5. Blend or process or crush using mortar and pestle the garlic, shrimp paste, ginger and chilli until you have a nice stinky paste.
6. Heat oil in wok and stir-fry spice paste until fragrant. Add prawns, frying for a minute or so. Add egg, stir-fry until the egg just sets. Add noodles, tamarind mixture, chicken, sprouts and half of the onion; stir-fry, tossing gently until combined and everything is heated through.
7. Remove from heat; toss remaining green onion, coriander and nuts through pad thai.
8. Serve with lime wedges (and perhaps some extra sprouts, coriander and crispy fried onion pieces for good measure).

This recipe actually says it serves four people, but last night's effort managed to create six decent sized meals (especially when followed up with Bakewell Tartlettes and ice cream! Strange combination of dishes I know, but it went down a treat.)


Pad Thai Noodles With Shrimps on Foodista

Sunday, June 28, 2009

June Daring Bakers' Challenge

Four fruits Bakewell Tart with ice cream and glace cherries

This is my maiden voyage into the world of the Daring Kitchen, having only just recently joined. I put my hand up to be a Daring Baker, though might also get involved in the Daring Cooks' Challenges once I've got the hang of fitting the Daring Bakers' challenges into my routine! Basically, there is a different challenge put forth each month, resulting in all involved making the same recipe and comparing results! There are no prizes but it is quite fun to see the variation in results and to learn from more experienced cooks.

The June Daring Bakers' challenge was hosted by Jasmine of Confessions of a Cardamom Addict and Annemarie of Ambrosia and Nectar. They chose a Traditional (UK) Bakewell Tart... er... pudding that was inspired by a rich baking history dating back to the 1800's in England.

Hooray! A traditional English dessert, perfect for someone who has just started sharehousing with a traditional English lass. Well, an English lass. It was just as well that I was providing her with something nice to eat, given that I think I've exhausted the limits of referring to her as a traditional English Bakewell Tart over this month.

I have to confess I had actually not heard of a Bakewell Tart prior to learning of this challenge, so can't attest to just how traditional this particular recipe is. Calling anything traditional is generally fraught with danger, as most people tend to think that the way their Granny or Great Aunt Beryl made it must be the final word, even if old Beryl had more cats than sense.

I must admit I was a little daunted when I first read the recipe for the Bakewell Tart, given the three elements - sweet shortcrust pastry, frangipane and jam/curd. Reading further however, it became apparent that this exercise could be broken into manageable tasks and if time was not on my side I could use ready made jam or curd instead of making my own. Sadly this was the case (plus winter isn't exactly a great time of year to be making jams unless you want to bust out some rhubarb or pear or pumpkin jam) but I used very nice jams so don't hold this against me. In fact, I was keen to try a few different types of jam so I opted to make little tartlettes instead of a big tart.

Following the recipe (repeated verbatim below) I managed to make 4 tartlettes and 5 little tarts in my Texas muffin tray. We had friends around for dinner last night, and I served up the 4 tartlettes for dessert, but sadly given the lighting in our house I wasn't able to get any decent photos of them before they were devoured. I received quite possibly one of the best compliments I've ever received for my cooking, when one of the friends said the only problem he had with it was that he couldn't quite fit enough in his mouth at once.

I really enjoyed my first Daring Bakers experience, and thank the hosts for introducing me to this great new dessert. I feel more deserving of my British citizenship now.

My jams of choice - St Dalfour Four Fruits, Black Cherry (chockers with big cherries! Yum!) and Thick Apricot

Four little tartlettes, all poofy and warm

And a cherry on top!


Bakewell Tart...er...pudding

Makes one 23cm (9” tart)
Prep time: less than 10 minutes (plus time for the individual elements)
Resting time: 15 minutes
Baking time: 30 minutes
Equipment needed: 23cm (9”) tart pan or pie tin (preferably with ridged edges), rolling pin

One quantity sweet shortcrust pastry (recipe follows)
Bench flour
250ml (1cup (8 US fl. oz)) jam or curd, warmed for spreadability
One quantity frangipane (recipe follows)
One handful blanched, flaked almonds

Assembling the tart

Place the chilled dough disc on a lightly floured surface. If it's overly cold, you will need to let it become acclimatised for about 15 minutes before you roll it out. Flour the rolling pin and roll the pastry to 5mm (1/4”) thickness, by rolling in one direction only (start from the centre and roll away from you), and turning the disc a quarter turn after each roll. When the pastry is to the desired size and thickness, transfer it to the tart pan, press in and trim the excess dough. Patch any holes, fissures or tears with trimmed bits. Chill in the freezer for 15 minutes.

Preheat oven to 200C/400F.

Remove shell from freezer, spread as even a layer as you can of jam onto the pastry base. Top with frangipane, spreading to cover the entire surface of the tart. Smooth the top and pop into the oven for 30 minutes. Five minutes before the tart is done, the top will be poofy and brownish. Remove from oven and strew flaked almonds on top and return to the heat for the last five minutes of baking.

The finished tart will have a golden crust and the frangipane will be tanned, poofy and a bit spongy-looking. Remove from the oven and cool on the counter. Serve warm, with crème fraîche, whipped cream or custard sauce if you wish.

When you slice into the tart, the almond paste will be firm, but slightly squidgy and the crust should be crisp but not tough.

Jasmine’s notes:
• If you cannot have nuts, you can try substituting Victoria sponge for the frangipane. It's a pretty popular popular cake, so you shouldn't have any troubles finding one in one of your cookbooks or through a Google search. That said, our dear Natalie at Gluten a Go Go has sourced some recipes and linked to them in the related alt.db thread.
• You can use whichever jam you wish, but if you choose something with a lot of seeds, such as raspberry or blackberry, you should sieve them out.
• The jam quantity can be anywhere from 60ml (1/4 cup) to 250ml (1cup), depending upon how “damp” and strongly flavoured your preserves are. I made it with the lesser quantity of home made strawberry jam, while Annemarie made it with the greater quantity of cherry jam; we both had fabulous results. If in doubt, just split the difference and spread 150ml (2/3cup) on the crust.
Annemarie’s notes:
• The excess shortcrust can be rolled out and cut into cookie-shapes (heck, it’s pretty darned close to a shortbread dough.

Sweet shortcrust pastry

Prep time: 15-20 minutes
Resting time: 30 minutes (minimum)
Equipment needed: bowls, box grater, cling film

225g (8oz) all purpose flour
30g (1oz) sugar
2.5ml (½ tsp) salt
110g (4oz) unsalted butter, cold (frozen is better)
2 (2) egg yolks
2.5ml (½ tsp) almond extract (optional)
15-30ml (1-2 Tbsp) cold water

Sift together flour, sugar and salt. Grate butter into the flour mixture, using the large hole-side of a box grater. Using your finger tips only, and working very quickly, rub the fat into the flour until the mixture resembles bread crumbs. Set aside.

Lightly beat the egg yolks with the almond extract (if using) and quickly mix into the flour mixture. Keep mixing while dribbling in the water, only adding enough to form a cohesive and slightly sticky dough.

Form the dough into a disc, wrap in cling and refrigerate for at least 30 minutes

Jasmine’s notes:
• I make this using vanilla salt and vanilla sugar.
• If you wish, you can substitute the seeds of one vanilla bean, one teaspoon of vanilla paste or one teaspoon of vanilla extract for the almond extract

Frangipane

Prep time: 10-15 minutes
Equipment needed: bowls, hand mixer, rubber spatula

125g (4.5oz) unsalted butter, softened
125g (4.5oz) icing sugar
3 (3) eggs
2.5ml (½ tsp) almond extract
125g (4.5oz) ground almonds
30g (1oz) all purpose flour

Cream butter and sugar together for about a minute or until the mixture is primrose in colour and very fluffy. Scrape down the side of the bowl and add the eggs, one at a time, beating well after each addition. The batter may appear to curdle. In the words of Douglas Adams: Don’t panic. Really. It’ll be fine. After all three are in, pour in the almond extract and mix for about another 30 seconds and scrape down the sides again. With the beaters on, spoon in the ground nuts and the flour. Mix well. The mixture will be soft, keep its slightly curdled look (mostly from the almonds) and retain its pallid yellow colour.

Annemarie’s notes:
• Add another five minutes or more if you're grinding your own almonds or if you're mixing by hand (Heaven help you).

I roo the day..


Today's lunch - reheated roo pizza left over from last night's dinner. It was my first pizza making experience in my new house, and the dodgy oven turned itself off half way through the first pizza. Luckily there was enough heat in the oven to keep the pizza nicely cooking away, but it was annoying nonetheless, and meant a long wait for pizza number two (which we really didn't need but managed to eat some of anyway).

The pizza dough was made in my trust breadmaker using Pizza & Focaccia mix from All About Bread. Other alternatives are this Semolina pizza dough or this basic pizza dough. When making mine completely from scratch I like to use half white flour and half wholemeal flour. Making pizza dough from scratch really isn't that difficult but it is nice to have the breadmaker do it all for me, including finding somewhere nice and warm to let the dough rise (in its belly!).

Letting the pizza stone get nice and hot in the oven, I rolled out enough dough for one nice big pizza and spread the tomato base. I used to make my own tomato sauce for the base, but I've been having nice results using Leggo's Pizza Sauce with Garlic, Onion and Herbs. I'm sure pizza purists would scoff at this, but hey, I'm making pizza with kangaroo so I'm not exactly trying to emulate the traditional Italian masters here.

Toppings on these pizzas were bocconcini slices, chopped green capsicum, sliced button mushrooms, sliced red onion, semi dried tomatoes, chopped green olives (just on my half of the pizza... no rogue olives managed to make their way over to the olive-free zone), grape tomatoes and kangaroo! The kangaroo was sliced up to make sure there weren't any big chunks that may not have cooked through enough during the pizza cooking time (about 15 minutes) and put on raw.


We were both so impressed with these pizzas, with the roo being perfectly cooked! It was so tender and juicy, and the pizza based crisped up very nicely on the bottom. I think my pizza stone was possibly the best $13 I ever spent, though I really do need to go buy another one so that I don't need to wait for it to get hot again for pizza number two! I see no point in making only one pizza per pizza session, as the following day is filled with opportunities for pizza eating, particularly when it is a Sunday and you've possibly had a few too many champagnes with pizza number one the previous night.

Friday, June 26, 2009

It's all Greek to me

Ooh, I'm a devil-may-care flying fool! I decided to throw caution to the wind and make baklava last week despite my oven still being un-fixed and super dodgy. I figured there are surely enough Greek gods around to bring good fortune to my endeavours, and I am relieved to report that they were smiling down upon me this time. I'm sure it has something to do with my painstaking drawings of them in my impressive Greek Gods project I did in year six. I got an A+ and multiple stickers for that baby, if I remember correctly.

The reason behind this new Greek project was my fortnightly research group meeting, and the fact that I was driving up to Geraldton the following day and catching up with my baklava-loving sister. It's also a recipe that I've been wanting to try for some time, just to see if I could pull it off. I wasn't expecting it to be quite as good as the great baklavas I have eaten in my time (including the chocolate covered beauty I had in Melbourne) but I knew I could at least better the bad ones I've had (bad largely due to not being fresh, I suspect).

The fruits of my labour were decidedly un-bad! Quite good, in fact! I managed to save a few pieces to take up to Gero with me, and even my Dad enjoyed it (Me:"Do you want some baklava Dad?" Dad:"Do I want who?"). I'm very pleased to say my sister enjoyed her pieces, and although my brother-in-law said it's not the best he's eaten, he managed to polish off quite a few pieces to my sister's dismay. Apparently the little end pieces don't count as pieces, no matter how many you eat.

I was quite the food fairy this weekend actually, as I also was the bearer of Miami Bakehouse pies to my family. Nothing quite says 'I love you' like a Miami Bakehouse Seafood Platter or Garlic Prawn pie (except maybe freshly made baklava).

(Disclaimer: Please stop reading now if you have any heart or tight-jeans conditions.)


Baklava, about to be devoured by my Dad (thanks Mum for your pretty plate for the photo)

Baklava
(from Company's Coming: Baking - Simple to Sensational by Jean Paré)

Ingredients

Nut mix
1 1/2 cups finely chopped pistachios, toasted
1 1/2 cups finely chopped pecans, toasted
1/3 cup granulated sugar
1/4 cup brown sugar, packed
1/2 tsp ground nutmeg
1/2 tsp ground cinnamon

Pastry goodies
16 frozen filo pastry sheets, thawed according to package directions
3/4 cup butter, melted

Orange syrup
3 cups granulated sugar
2 cups water
1/4 tsp ground cardamom
1 small navel orange, cut into 1/4 inch (6 mm) slices (end slices discarded)

Method

1. Combine first 6 ingredients in medium bowl. Set aside.
2. Work with filo sheets 1 sheet at a time. Keep remaining sheets covered with damp tea towel to prevent drying.
(Note: You'll need to have a pan that is half the size of your filo pastry sheets. My pan was a little too small so I just trimmed the sheets a little so that they were double the size of my pan.)
3. Lay 1 pastry sheet on work surface. Brush with melted butter. Fold in half crosswise. Place in 9 x 13 inch (22 x 23 cm) pan (or whatever you have, providing it is twice the size of the pastry!). Brush with melted butter.
4. Repeat with 4 more pastry sheets and melted butter, finishing with melted butter.
5. Sprinkle 1/3 of nut mixture over top.

Baklava nut mix

6. Repeat layering with another 3 folded sheets of pastry over nut mixture, brushing with melted butter after each layer.
7. Sprinkle with another 1/3 of nut mixture.
8. Repeat layering with another 3 sheets of pastry over nut mixture, brushing with melted butter after each layer.
9. Sprinkle with remaining 1/3 of nut mixture.
10. Repeat layering with remaining (5) pastry sheets, brushing with remaining melted butter.
11. Score diamond pattern across pastry using a sharp knife. Insert knife down into pastry, almost, but not quite through, to bottom of pan.
12. Bake in 350 F (175 C) oven for about 40 minutes (prepare the orange syrup while it is baking) until deep golden brown and crisp. Keep hot.

Baklava fresh out of the oven

Orange Syrup
13. Combine sugar, water and cardamom in medium saucepan. Add orange slices. Heat and stir on medium for about 2 minutes until sugar is dissolved.

Hot bubbling syrupy goo

14. Increase heat to medium-high. Brush side of saucepan with damp pastry brush to dissolve any sugar crystals. Boil for 12 minutes without stirring. Remove from heat. Discard orange slices. Makes 2 3/4 cups syrup.
15. Slowly pour hot syrup over hot pastry, allowing it to fill in spaces and score marks. Let stand, uncovered, at room temperature overnight.

All syruped up with nowhere to go

16. Cut through to bottom, following scored diamond pattern. Baklava can be covered with sheet of waxed paper and stored at room temperature for 3 to 4 days or wrapped and frozen for longer storage. Makes about 30 diamond shaped pieces (if using the recommended pan size).


1 piece: 251 calories; 12.9 g Total Fat (6.4 g Mono, 2 g Poly, 3.9 g Sat); 13 mg Cholesterol; 34 g Carbohydrate; 1 g Fibre; 2 g Protein; 100 mg Sodium.

Belly full of fishy goodness

Dinner time rolled around tonight and I was hungry. I waited awhile for some dinner to magically appear in front of me, but as I was home alone this proved a fruitless exercise. I finally made my way downstairs and started scratching around the kitchen, waiting for inspiration to strike. I got some Spanish Mackerel out of the freezer, defrosting it in some warm water while I continued my quest for inspiration in the fridge and pantry. Luckily my vegetable drawer is never empty and it didn't take too long for an idea to form in my hungry brain. I ended up making an incredibly tasty ratatouille inspired fishy stew thing!

Ingredients were - in order of appearance - olive oil, onion, eggplant, carrot, red capsicum, garlic, red chilli, tinned chopped tomato, capers, green olives (stuffed with jalapenos), mixed herbs, anchovies and chunks of the defrosted Spanish mackerel. I would have liked to have served it on a bed of English spinach, but the closest I had was baby bok choy so I chopped that up and used it as a nice little bed for my fishy creation.

Yum!!!

Thursday, June 25, 2009

This time with (l')attitude

I spent last weekend up in Geraldton and finally got myself to the hot new place in town, l'attitude 28. Now, there was much excitement when this place first opened a couple of months ago, and I think during the opening weekend pretty much all of my Gero facebook friends had status updates that were somehow l'attitude 28 related. Unsurprisingly however, everyone's excitement and enthusiasm for this new bar and restaurant seemed to be unrequited. The cocktails are apparently amazing, but heaven help you if you would like some snacks to line your stomach with whilst quaffing them. Some family members went in around 3pm one weekend not long after it opened to sample the cocktails, and were met with much confusion by waitstaff when they enquired about food choices as 3pm is between the lunch and dinner menus. They were eventually told they could choose any dishes off the tapas range of the dinner menu, which left them with the task of choosing between garlic prawns, marinated mushroom or a spanish omelette. Yes, nothing says cocktail glamour like slurping down a bowl of garlic prawns. Surely it would be quite easy to have some options such as Turkish bread and dips, or even chips and wedges on the menu? Sadly the service also left a bit to be desired, as the cocktails had to be chased up before being eventually delivered.

Despite these disappointing experiences, my sister and I decided to test out the new word around town that l'attitude 28 has been doing a good breakfast of late, when after waking reasonably early on Sunday for a possible tennis match (which I was somewhat fearful about given that my sister has actually been having lessons) we found the weather un-tennisable. When we arrived down there however, we were a little concerned as the carpark was completely empty and there was no signage at all to indicate that breakfast was being served. We parked anyway and walked in to discover that yes, breakfast was being served but perhaps was a well kept secret as noone else was in the restaurant.

The decor inside is quite nice and modern, and I later discovered that the toilet situation is pretty cool too. TV screens showing (dubious) music clips kept you entertained both within the bar/restaurant and whilst you were washing your hands (I hope!) in the toilets. Two of the four toilets were "out of order" but I guess this isn't really an issue when you are one of two people in the whole place.

Anyway, enough toilet discussion. The service during this visit was very prompt and very friendly. The breakfast menu is not vast, with only nine options, but covers most bases well and has a couple of more interesting dishes such as savoury French toast and my choice for the day - "Ricotta and Thyme Pancake - served with two poached eggs and portabella mushroom $18.50". My sister chose the "Eggs Royale - Two poached eggs on a muffin with smoked salmon and hollandaise sauce $18.50".

Both dishes were nice, but were let down in a couple of areas.

L'attitude 28 - Eggs Royale

The Eggs Royale were beautifully poached, and the hollandaise sauce - to our surprise - was very nice and seemed to be freshly made. No "eggs benny" sauce here! In fact, it would have been a fine example of a smoked salmon/poached eggs breakfast dish if only it were served with something a bit more impressive than a stock standard English muffin, such as the "rustic toast chargrilled in olive oil" that is served with their scrambled eggs. I can't help but equate white English muffins to a couple of slices of Tip Top Sunblest white sandwich bread, and using such ingredients can lead to annoyance at being charged handsomely for something you could easily knock up at home. Of course, it was clearly written on the menu that the dish was served on an English muffin so we have no cause for complaint here, but it would be a simple way to improve this otherwise very nice dish.

L'attitude 28 - Ricotta and Thyme Pancake

My eggs were also beautifully poached, and the mushrooms were delicious. Sadly however I could only get through perhaps half of the ricotta thyme pancakes, due to their incredibly doughy texture and taste. This was a real shame, as they had such a lovely flavour with the fresh thyme running through them, but there is only so much doughiness you can handle at once. The outsides looked reasonably well cooked, but I can only assume that the pan was perhaps a little too hot to allow the middles to cook through sufficiently or the batter was too thick.

So, both dishes had real potential but were let down by their carb components. Was it still good enough to get me back there to try out the new dinner menu next time I'm in town? We'll see if those tasty cocktails lure me in..

l'attitude 28
291 Chapman Road (corner Mabel St), Geraldton
Phone: 08 9965 3776
Email: cellar@lattitude28.com.au

Monday, June 15, 2009

Cheesy Vegizo and the Swinging Salads


Not only does Telethon do wonderful things for sick children, it now does wonderful things for cold, hungry women.

I braved Karrinyup shopping centre yesterday for the special Telethon Sunday trading day, and managed to pick up quite a few bargains for the pain of getting stuck behind dawdling fools and waiting an age to try anything on. We missed out on seeing Fat Cat in the Food Court but caught a few glimpses of the "stars" of Packed to the Rafters. At least, we think it was them, as that is what the signs were advertising, and they seemed to be signing things and getting screamed at by teenage girls with terrible hairstyles and awful tights. I think my distaste for the wearing of tights as leggings (especially when they're a bit old and saggy and even more see-through) has reached its limit and I just don't care anymore.

Our biggest bargains were found at House, where my friend and I both picked up some very cute individual ovenware dishes (with lids!) for only $1.99 each and I also got a nice lasagne size square ovenware dish (sadly sans lid) for $10. A nice lasagne size dish? Why, I should make lasagne!

Given the non-beef eating, I have a nice recipe for a simple tomato and bean lasagne that was a regular in my cooking repertoir a few years ago. I wanted to make a more interesting lasagne for the maiden use of my new dish, but scouring of cooking websites and flicking through cookbooks didn't really yield anything that took my fancy. I thus decided to invent my own lasagne, and the Vegizo was born.


Cheesy Vegizo Lasagne

Serves 6 with side salad

Preparation time: 1-1.5 hours
Cooking time: 45 minutes + 15 minutes resting time

Ingredients
Chorizo Mix
1-2 tsp olive oil
1 small-medium onion, finely chopped
1 carrot, thinly sliced
1 stalk of celery, thinly sliced
3-5 mushrooms, sliced
85 g hot chorizo, thinly sliced
500 g pasta sauce (I used Five Brothers Oven Roasted Garlic with Wine Pasta Sauce)

5-6 slices of eggplant, ~3 cm thick
1 medium-large red capsicum

Spinach Mix
250 g frozen spinach, thawed and drained well (squeeze!)
3/4 cup ricotta
1 egg
1/4 cup grated cheese (mixture of mozzarella, cheddar, parmesan)
1 garlic clove, crushed/chopped

Bechamel Sauce
1.5 Tb butter
2 Tb olive oil
4 Tb plain flour
3 cups milk
3/4 to 1 cup grated cheese (mozzarella, cheddar, parmesan)

Lasagne sheets (I use dried instant ones, though would like to try fresh ones soon)
Good handful of grated cheese (mozzarella, cheddar, parmesan)
Salad of your choice to serve with

Method
Chorizo Mix
1. Heat the oil in a saucepan or frying pan on high heat. Saute the onion for 2-3 minutes.
2. Add the carrot, celery, mushrooms and chorizo and cook for ~5 minutes.
3. Add 3/4 of the jar of pasta sauce and stir through, reducing the heat and allowing the mixture to simmer for 10 minutes. Remove from heat.

4. Roast the capsicum. Remove skin, stalk and seeds and cut into large segments. I like to roast my capsicum by putting it under a hot grill, turning until all the skin is blackened. I then put it in a glass bowl, covering it with plastic wrap and leaving it for a few minutes. The skin will then slip easily off, and you are left with a kind of slimey (but in a good way) delicious naked capsicum!

5. Heat a frying pan over a medium-high heat, and add a little olive oil. Fry the eggplant slices on both sides until a nice golden brown colour. Remove from heat and set aside.

6. Preheat oven to 190 degrees C.

Bechamel Sauce
6. Add the butter and olive oil to a medium saucepan and melt over a low heat.
7. Add the flour to the pan and stir well. It should be a nice pastey consistency. If necessary, add more oil if it is too thick/dry.
8. Gradually (especially crucial at the start) add the milk, whisking well to make sure you don't have any lumps. Continue to whisk over a low-medium heat until the sauce thickens (possibly 10 minutes or so).
9. Remove pan from the heat and add some salt and pepper and the cheese, stirring until the cheese has melted through the sauce.

Spinach Mix
10. Combine the spinach (making sure you've squeezed all the water out), ricotta, egg, cheese and garlic clove in a bowl, adding 1/3 cup of the bechamel sauce. Mix well.

Making the Lasagne!
11. Cover the bottom of a 22cm square baking dish (or equivalent) with the remaining 3/4 jar of the pasta sauce.
12. The layers are then like so:
  • Pasta,
  • Half of the chorizo mix,
  • Eggplant slices,
Chorizo mix and eggplant layer - could do with more eggplant
  • Third of the bechamel sauce,
  • Pasta,
  • Spinach mix,
Cos I eats me spinach
  • Pasta,
  • Remaining half of the chorizo mix,
  • Roasted capsicum slices,
Chorizo mix and roasted capsicum layer - should have used a larger capsicum!
  • Second third of the bechamel sauce,
  • Pasta,
  • Remaining third of the bechamel sauce,
  • Grated cheese.
13. Bake in the preheated oven (190 degrees) for 45 minutes.
14. Remove from oven and allow to rest for 15 minutes before slicing and serving.
15. Serve with a nice garden salad.

With a sprinkling of freshly grated parmesan

I was really happy with how this lasagne turned out, and even happier when we discovered that after making two meals out of it, there were another four meals to be saved in the fridge for later. I was particularly happy that even with all the piles of ingredients making up the layers, it did not overflow when cooking! I tend to get a bit greedy when cooking, and it is not unknown for me to have a particularly saucy lasagne overflow in the oven, or to have a stirfry that was meant to only feed one person end up being large enough for a family. I'm pretty good when baking though, as I tend to only make minor changes to recipes and so I've not had any cake overflow experiences. The Vegizo also sliced really well, keeping its layers nicely after having a 15 minute rest before cutting and serving. This was possibly the longest 15 minutes of my life.

The only changes I would make to the recipe would be to add some anchovies to the chorizo layer (which I wanted to do but wasn't sure if my housemate was down with the salty fishy goodness) and add garlic to the spinach mix (I've added this to the recipe even though I didn't include it when I made it). I'll definitely continue to use hot chorizo as it gives a really nice heat to the dish. It wasn't overly hot, but I guess this is dependent on the type of chorizo you use. Mine was Mondo Doro Smallgoods Hot Chorizo, which I got at the little continental deli place which I can't remember the name of, in that little alley which I can't remember the name of on Beaufort St just a few shops south from IGA. They have lots of good stuff in there, as I've recently discovered. Heaps and heaps of types of cheese, pastas, tasty treats like date & nut rolls, and they seemed to be a popular spot to pick up sandwiches and rolls for lunch. Oh and while I'm talking about Beaufort Street, head down to the Merchant for a bloody good muscat they're selling at the moment. Only $17 (although when I looked at my receipt later it said $14) and it's creamy and delicious (and I don't normally like sweet wines).
Apparently today they're also getting in quite a lot of new wines to their collection, so go stock your cellars and/or cupboards and/or bellies.

Thursday, June 11, 2009

Advance Australia Fare

What's that Skip? Little Jimmys stuck down the well and need something to eat? I know, let's get him a burger! But what kind...?

Although not quite as useless as asking people where the best place to go for Dim Sum is (no two people ever say the same place, and most people don't know the name of the place they go to), it's difficult to find a definitive answer of where to find Perth's best burger. I guess this actually makes a bit of sense though, as different people tend to find different burger qualities more important than others. Some just want a massive slab of meat with sauce and bread, others need a good loading of salad to counteract the meat hit. For some people it's all about the sauce, and for some it's all about the quality of the sides. There's also the location to take into account, as it takes a bit of dedication and forethought to get up to Alfred's Kitchen in Guildford if you have a burger craving and live in Spearwood.

I have to confess that I'm a bit useless myself when it comes to local burger know-how. I am familiar with the names that are often put forward as the best burger joints - Alfred's Kitchen (Guildford), Flipside Burger Bar (North Fremantle and Wembley), Bilby's Chargrilled Burgers (Mount Claremont), Jus Burgers (Leederville), Retro Betty's Cafe (Leederville), FAB (Hillarys and Subiaco) and apparently The Moon Cafe (Northbridge) makes a mean vegie burger - but I hadn't gone to any effort to try any of these burgers. Until last Friday.

Given that I don't eat beef, it takes an interesting burger menu to get me excited. Giving me the choice of having a chicken burger or a frozen vegie patty burger, when the rest of the burger menu has dozens of beef options, just isn't going to do it for me. After noticing Jus Burgers in Leederville during my recent jaunts in that part of town, and hearing some good things about it, I checked out the menu on their website. In addition to beef burgers they also serve lamb, chicken, fish, roo, pork and three types of vego burgers. Perhaps this was just the burger menu to get me excited!

With a mean hunger, a friend and I moseyed on in to Jus Burgers last Friday for a late lunch. We were greeted warmly and took the last free table near the kitchen, having a moment to again look over our options before a waitress came over to ask if we had been there before, and to explain the menu to us. There wasn't too much to explain really, apart from the fact you have to order and pay at the counter and they bring your food to you. She also explained to me in particular, that the burgers are quite large (I think she stated how many grams) but there is the option of going for "The Grommit" option which is a smaller version of most of the burgers. Clearly she did not know who she was dealing with.

All the burgers are served with lettuce, beef tomato, Spanish onion, relish & house made aioli, and you have a choice of white or wholemeal Turkish buns (and there is a gluten free option). Choosing the type of bread was easy (wholemeal all the way, baby) but it was really very difficult to decide which burger to go with, as they all sounded bloody good. My shortlist included the "Original Lamb" (with mint chutney), "Turkish Lamb" (with Tahini yoghurt & Middle Eastern slaw), "Roo burger" (with horseradish slaw & goan cuisine green chilli jam) and "The Pumpkin" (roasted panko crumbed pumpkin & goat's cheese with basil pesto). Oh Skippy, I'm sorry, but you just sound too good to refuse. How could I resist "100% West Australian Kangaroo meat & char grilled"? 'twould be unAustralian. On its own, my burger cost $13 but I of course chose to have it in a meal deal with salad (or you can have chips), green tomato pickle and slaw for an extra $5.


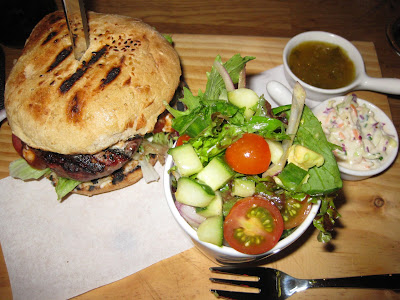
Jus Burgers - Roo Burger meal deal

I really like the way the burgers are served, on a wooden board with a steak knife stabbed through their little hearts. Convinced my burger was not going anywhere, I started off by trying the salads and pickle, and found them to my liking. I had forgotten to ask for my salad dressing on the side, but the vinaigrette was light and pleasant and the salad nice and fresh. The slaw of course was drowned in dressing, as is the way with slaw, but with such a petite serving this was actually quite alright. It was nice, as far as coleslaw goes, but I don't think I finished it. The green tomato pickle was really good, and nice to dunk little bits of your bun into, or add into your burger.

Cutting my burger in half was totally necessary, given its impressive girth, and I was soon getting stuck into our national emblem and dealing with dripping sauce and messy hands for my trouble. The meat was spot on, loads of flavour and a great texture (no bits of gristle to contend with, ugh). The green chilli jam in the burger was also really good, giving a lovely (yet subtle) heat to the dish, which I guess was also assisted by the horseradish. The rest of the ingredients in the burger all kind of melded into one big delicious oozy mess, and my nice clean wooden board was soon showing only signs of a struggle having taken place.

One burger joint down, and the bar has been set pretty high.

(I hope Charlie the Wonder Dog found little Jimmy)

Jus Burgers
743 Newcastle Street, Leederville
Phone: 08 9228 2230
Email: justin@jusburgers.com.au
www.jusburgers.com.au
Hours: Tues-Sat 11:30am-10pm, Sun 12noon-9pm


Jus Burgers on Urbanspoon

Monday, June 8, 2009

You've got to roll with the walnuts

Apparently there was much gnashing of teeth and grumbling of tummies at the fortnightly meeting of my research group that happened whilst I was in Melbourne. I can only hope that my scientific expertise and sparkling wit were missed as much as my baking, but not wanting to test this too far I thought I'd better whip up something nice for the next meeting.

There were quite a few recipes I was itching to try, but due to an oven 'situation' I had to narrow my recipe search down a little. Flipping through my Canadian baking cookbook (Baking - Simple to Sensational) that I had enjoyed much success with, with the Almond and Black Pepper Biscotti and Onion and Walnut 'biscuits' that I made for our last bookclub meeting, I came across something interesting that didn't call for too much baking time. You see, my fantastic new apartment has a very temperamental oven that gets a bit too hot and bothered once it's been on for a while, and switches itself off to have a little rest. No amount of coaxing or threats of Mr Muscle will get it to turn back on. So, even though I've been dying to bust out a tray of baklava, I think my heart would have broken if the oven turned off half way through and left me with a tray of inedible goopiness. I decided not to gamble with the baking gods, and chose a recipe that required only 15-20 minutes baking time - "Cream Cheese Tea Ring". The cake is described in the book as "light and fluffy biscuit dough with a soft cream cheese and fruit filling. Fabulous!", plus it required cutting.. with scissors! I had to give it a try.

Snippety Snip Cake
(AKA Cream Cheese Tea Ring from Company's Coming: Baking - Simple to Sensational by Jean Paré)

Ingredients

Cream Cheese Filling

250 g cream cheese, softened (I used light Philly)
1/4 cup granulated sugar (I used caster sugar)
1/2 tsp vanilla

Fruit Bread

2 cups all-purpose flour
2 Tb granulated sugar
4 tsp baking powder
3/4 tsp salt
1/4 cup cold butter, cut up

Approximately 3/4 cup milk

Fruit Filling

1/3 cup chopped pecans, walnuts or almonds (I used walnuts)
1/3 cup chopped raisins (I used sultanas)
1/3 cup chopped glace cherries

Almond (or in my case, Vanilla) Glaze
1/2 cup icing sugar
1/4 tsp almond flavouring (I used vanilla extract as I find almond flavouring very overpowering and not terribly pleasant as a rule)
Approximately 1 Tb milk

1 Tb chopped pecans, walnuts or almonds, toasted (I used walnuts)

Method
1. Beat cream cheese, sugar and vanilla in a small bowl until smooth. Set aside.

Fruit Bread
2. Combine first four ingredients (flour, sugar, baking powder, salt) in large bowl. Cut in butter until mixture resembles coarse crumbs.
3. Stir, adding enough milk until soft dough forms.
4. Turn out onto lightly floured surface. Roll out to 10 x 14 inch (25 x 35 cm) rectangle. Spread with cream cheese mixture, leaving 3/4 inch (2 cm) edge.

Filling
5. Sprinkle pecans (walnuts), raisins (sultanas) and cherries over cream cheese mixture (I confess I added a little bit more than the recipe said to. I wanted to make sure everyone got a good amount of nuts and fruit).


Rolling and Cutting!
6. Roll up, jelly roll-style, from long side. Press seam against roll to seal. Shape into ring. Place, seam-side down, on greased baking sheet. Pinch ends together to seal.
7. Cut ring 14 times from outside edge to within 1 inch (2.5 cm) of centre using scissors (luckily we had just been to IKEA so we had fresh kitchen scissors! And a carload of other things, but I digress..).
8. Turn each cut wedge on its side, all in the same direction, allowing them to overlap.


9. Bake in 220 C oven for 15 to 20 minutes until golden brown. Let stand on baking sheet on wire rack for about 30 minutes until cool.

Almond (Vanilla) Glaze
10. Combine icing sugar and almond flavouring (vanilla extract) in small bowl. Stir, adding enough milk until smooth, barely pourable consistency. Makes about 1/4 cup glaze. Drizzle or pipe over tea ring. Sprinkle with the toasted nuts.


(FYI, it cuts into 14 pieces, each with 254 calories, 12.1 g total fat (4.1 g mono, 0.9 g poly, 6.4 g sat), 30 mg cholesterol, 33 g carbohydrate, 1 g fibre, 4 g protein, 330 mg sodium)


This recipe was a real success! The "fruit bread" was lovely and soft and not very sweet, the cream cheese spread was nice and sweet and gave the cake an element of rich gooeyness, whilst the fruit and walnuts added another level of texture. The vanilla glaze worked really well, again due to the fruit bread not being very sweet on its own. I enjoyed making and eating this, and will be experimenting with some different fillings in the future. It was also actually pretty straightforward to make, despite the whole rolling and cutting factor, and of course it looks pretty cool too! The only downside to it is that the section of the cake that contained the part where the two ends joined together was a little lacking in filling, but I took one for the team and made sure that I ate this piece. I may possibly have also eaten some of the other pieces, but my memory is a little hazy. In any case, next time I think I'll be sure to put the spread and filling up to the very end of one side to try and prevent this little section from missing out on the fruity nutty goodness so much.

Sunday, June 7, 2009

Let's go fly a kaiten

A friend and I were planning to catch up over dinner last week and wanted something cheap and healthy. Some sort of Asian fare sprang to mind, and I remembered reading about a new-ish kaiten sushi place in Mount Lawley. I tend not to think of kaiten sushi in Perth as being cheap, but given that the two reviews I managed to find online of this place said it was really good, and sushi is generally pretty healthy (if you can resist the fried optional extras) we decided to give it a go.

Reading that Yuzu is quite small, I made a booking after confirming with my friend that my restaurant selection was acceptable. She then did some internet detective work, read the good reviews and also read that the restaurant is quite small, and also made a booking. Luckily our double booking was realised pretty quickly and we cancelled one. I hope no similarly sushi-hungry people called to book a table within that 15 minute window, but I guess they could have consoled themselves by eating at the nearby "mix Asian cuisine" restaurant Goreng² which is also owned by Kenny Chan, the owner of Yuzu.

It is true that Yuzu is quite small inside, with three tables that I guess could seat 4-6, and also bench seats up along the conveyor. We were up at the bench, with no awkward twisting or reaching over each other necessary to secure any morsels before they whizzed past. We got stuck into a few plates of sushi rolls, and then held ourselves back as I'd read that the hot foods tend to get added to the conveyor after 7:30 and we didn't want to fill ourselves up in case something delicious needed to be eaten. This was indeed the case, as fried deliciousness soon appeared and begged to be eaten lest it go cold. Here are a few of the things we tried, and also a couple of things that I would like to have tried but held myself back...

Popeye Roll (Chef's recommendation) - "Seasoned and cooked spinach coated with black sesame seeds" ($3.20)

The spinach in these babies was absolutely delicious. I wonder what it was seasoned with? Olive Oyl perhaps? Ho ho..

Philadelphia Roll - Smoked salmon, cream cheese, avocado and black sesame seeds ($3.90)

Delicious. I'm a sucked for anything with smoked salmon, and when it's this fresh and combined with these ingredients I'm sold. Yum.

Some sort of crab claw ball thing. Intriguing...

Neither of us went for a ball o' crab claw, though I was strongly tempted.

Avocado Prawn Katsu (Chef's Recommendation) - Katsu prawn topped with avocado drizzled with mayonnaise and teriyaki sauce ($3.90)

Yum! Fresh out of the kitchen so the prawns were steaming hot inside their crunchy coating. We shared this place between the two of us so we didn't feel too bad about succumbing to the fried goodness. Clearly however this got the fried parts of our bellies working, as we decided to order something from the menu - another Chef's Recommendation, the tempura sweet potato.

Tempura sweet potato

OK so maybe the "healthy" part of our dinner didn't quite go according to plan, but it is very difficult to resist freshly made tempura sweet potato, especially when it is presented like a puzzle. Hey, at least we didn't go crazy on crab balls. It could have been worse.

We also had some other of the usual sushi suspects which I failed to photograph but were also very nice and fresh.

We also saw quite a few hot meals coming out of the kitchen, which you can order off the menu instead of, or in addition to, eating from the conveyor. They all looked really very good, and ranged in price from $11.90 for the "chicken teriyaki classic" to $15.90 for "prawn itame". Quite a few options to choose from, and the ones we saw looked very generously portioned and freshly prepared. We already have plans to go back for dinner to try some of these.

Yuzu are also responsible servers of spinach:

Why thank you, Mr Happy Toothpick Man!

Yuzu Kaiten Sushi
Shop 11, 649 Beaufort Street, Mount Lawley
(in the building on the corner with Walcott Street, near Dome and Fresh Provisions)
Ph: 08 9227 1880
Hours: Tues-Sun 5:30-9:30

Yuzu Kaiten Sushi on Urbanspoon

  © Blogger templates 'Neuronic' by Ourblogtemplates.com 2008

Back to TOP